Wednesday, January 1, 2014

Happy New Year 2014

No big celebration here since my DH is sick with a cold. We had the grandboys here yesterday and did want to do something fun with them for New Year's Eve. For their snack in the late afternoon we spread a tablecloth on the floor and set out a snacky picnic of chips and dips, cheese and sausage, and tiny pigs in a blanket. They boys enjoyed some sparkling grape juice in these tiny plastic martini glasses.

I dipped the rims in milk, then in some sprinkles to add a festive touch. They dried for about an hour before we used them. The boys love these red striped paper straws, so I cut one in half for these teensy glasses.

We had a fun little party before they went home, and with very little effort we made some fun memories. That is what holidays are all about!

Tammy

Saturday, August 28, 2010

I Can Now Show You....

what I've been helping my friend with for her cross-stitch business. Check out her website - www.ofgenerationspast.com

Monday, September 7, 2009

Fall Nesting

All around the internet, bloggers are putting up "fall nesting" posts, showing how they decorate their homes for what I consider to be the best season of the year. :o)
Decorating my own home for autumn is probably as fun for me as decorating for Christmas. I start in September with basic Fall things, pumpkins, gourds, etc., then in October the Halloween things are added in. On November 1 the Halloween gets put away and Thanksgiving comes out. One of my most favorite things to use is real mini-pumpkins.
I enjoy using a variety of textures in my decorating and crafting, so when I saw the proliferation of glittered mini-pumpkins that made blogland sparkle last year, I had to try them. Unfortunately I did not photograph each step of the process, but it's fairly elementary - you brush glue onto a pumpkin, then either sprinkle on the glitter or roll it in glitter. I did a little of both.
The glue was Elmer's white glue with a touch of water added to make it easier to brush. The glitter was Martha Stewart (got it on clearance at WalMart).
Here is the final product:Shortly after I started glittering my own pumpkins, we found out we were hosting a 50th wedding anniversary celebration, and had just two weeks to put it together. These pumpkins worked very nicely as part of the table decorations.
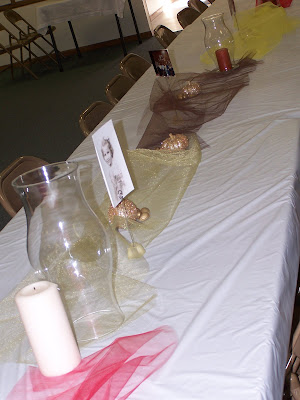
After the anniversary, they were used for my Thanksgiving decorating.
These glittered pumpkins added an easy and inexpensive (did I mention I grew the pumpkins in my garden?) sparkle to our Autumn celebrations!

Monday, February 16, 2009

2009 Holidays

New Year's Day -- January 1
Valentine's Day -- February 14
St. Patrick's Day -- March 17
Easter Sunday – April 12
Mother's Day – May 10
Memorial Day – May 25
Flag Day -- June 14
Father's Day – June 21
Independence Day -- July 4
Labor Day -- September 2
Halloween -- October 31
Thanksgiving -- November 26
Christmas -- December 25
New Years Eve -- December 31

Sunday, November 16, 2008

Popcorn Ornament Tutorial

These fun ornaments hang on the little tree on the ticket counter at our local movie theater. I made them last holiday season and the customers just loved them, and many of them asked me for the secret to getting the popcorn inside the glass ball. I'm going to share that secret here with you:
Supplies:
clear glass ball ornaments
unpopped popcorn (don't use the pre-packaged microwave corn that includes grease)
microwavable dishes
hot pads

First remove the metal top on the ornament and set aside. I rinsed the glass balls with vinegar and water and let dry overnight.
Put popcorn kernels in the ball - the amounts I used varied with the size of the balls. I think I counted out between 40-60 kernels per ornament.

Set the glass ball inside the microwavable dish. (Some instructions I've read say to use a paper bag, but that didn't work so well for me. I like being able to see the ornament and monitor the popping of the corn.)
Microwave on high until the kernels no longer pop. Each microwave is different, so I hesitate to put a length of time in my instructions. I just watched and listened, and when there was a count of 10 after the last pop I heard, I removed the ornament.

Keep in mind that these dishes and ornaments will be HOT when you remove them from the microwave. Use the hot pads and let everything cool before you handle them. I also had to take a few breaks and let my microwave cool off. Be warned, also, I did have a few of the glass balls break. Have some extras handy and please HANDLE WITH CARE.
Once they're cool you can shake out any unpopped kernels, then put the metal hanger back on and embellish as you desire. We added colorful candies from the theater concession stand, and hung them using ribbons.
I confess that I don't know how these fared over the year they've been in storage. I suspect the popcorn has dried up, but the good thing is that they can easily be emptied and refurbished if we need to.
These are an easy way to have somewhat old-fashioned decorations on your holiday tree, with a modern-day twist. Enjoy!

Last minute gifts tutorial every day


Sunday, October 26, 2008